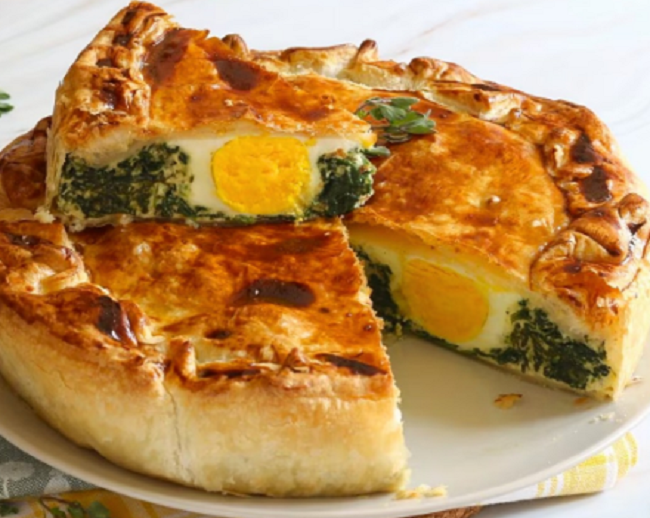
Torta Pasqualina: the easy recipe for a stuffed savory pie of Ligurian origin
Torta Pasqualina is a savory pie that is traditionally made for Easter : typical of Ligurian cuisine but appreciated and widespread throughout Italy, this tasty rustic cake is made up of two shells of very thin sheets of pasta which enclose a rich filling based on ricotta cheese , chard (or spinach ), spring onions and marjoram; unmissable, then, the raw eggs that become hard-boiled during cooking in the oven: just place them in special cavities created in the filling to obtain a real surprise effect when cut.
Similar in ingredients to another Ligurian specialty, the torta de gee , the Torta Pasqualina has ancient origins: in fact, it was already known in the 1400s, a time when it was considered a dish with a strong symbolic value . The presence of 7 eggs , considered a symbol of resurrection and rebirth, but above all the shell made with 33 sheets of pasta , in reference to the years of Jesus at the moment of the crucifixion, made it the Easter appetizer par excellence. Today, while remaining linked to the Easter period, this tasty rustic cake can be found all year round in cafeterias, bars and delicatessens in Liguria, declined in the various territorial variations.
The original Ligurian recipe calls for the pasta to be prepared at home with a mixture of water, flour and olive oil and rolled out by hand, sheet by sheet, while the filling must be based on chard and prescinsêua, or curd , a cheese fresh typical Genoese. We offer you a quick version of the Pasqualina cake, with ready-made puff pastry and a filling of boiled spinach and cow’s milk ricotta, easier to find than the typical cheese. The result has nothing to envy to the traditional version, but if you prefer you can prepare the puff pastry or shortcrust pastry at home and add a couple of tablespoons of low-fat white yogurt to the ricotta, so as to recall the sour taste of the prescinsêua.
Perfect to serve at Easter lunch to enrich your appetizer buffet , if the Easter cake is left over it is also ideal to take with you for the Easter Monday picnic together with other delicious savory pies , because it becomes even better when it rests. Find out how to prepare it by following the procedure and advice step by step.
If you liked this recipe, try the mini Pasqualine , the single-portion version of the Ligurian rustic, and the tasty version with artichokes . Don’t forget the other savory specialties that cannot be missing on the Easter table, including casatiello , salted pastiera and salted colomba .
ingredients :
For the pastry
Round puff pastry
2 rolls
For the stuffing
Clean spinach (or Swiss chard)
600 gr
Cow ricotta
450 gr
Egg
6
Grated Parmesan cheese
60 gr
Spring onions
2
Fresh marjoram
q.b.
Sale
q.b.
baby
q.b.
Extra virgin olive oil
q.b.
To brush
Egg yolk
1
Latte
1 drop
How to prepare Easter cake
If you decide to prepare the Easter cake in the traditional way, first prepare the puff pastry or brisée pastry dough , then let it rest while you dedicate yourself to the filling. If, on the other hand, you have chosen to use the ready-made pastry, as we did, skip this step and simply take the two rolls out of the fridge.
Step 1
Then begin the preparation of the Pasqualina cake by peeling and thinly slicing the spring onions1.
Step 2
Then collect them in a large pan together with a drizzle of oil and let them brown for a few seconds2. Then add the spinach, close the lid and leave to dry for a few minutes.
Step 3
As soon as the spinach has reduced in volume, remove the lid, season with salt and pepper and let all the water evaporate3. Don’t forget this step: to avoid getting a watery filling, it’s important that the vegetables lose all their moisture.
Step 4
In the meantime, take the most tender leaves and sprigs of marjoram, chop them finely4and add them to the pan. Season everything, then turn off and let it cool completely.
Step 5
Separately, put the ricotta in a fine-mesh strainer with a container underneath5and let it drip for at least an hour, so as to eliminate all the excess liquid.
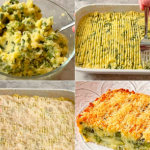
Step 6
Then transfer the ricotta into a bowl, add the grated Parmesan and one of the eggs. Then add the cooked and now cold spinach and mix with a spoon to obtain a creamy filling6.
Step 7
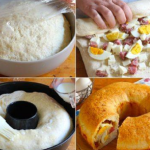
Cut out a disc of parchment paper and place it at the base of a 22 cm diameter mold, then arrange the first layer of puff pastry making it adhere well to the edges7. Prick the base of the pastry with the prongs of a fork.
Step 8
Stuff the pastry with the ricotta and spinach mixture, then, using the back of a spoon and applying moderate pressure, form five well-marked holes in the filling8.
Step 9
Gently open five eggs, one at a time, and let them slide into the recesses9.
Step 10
Now carve the second disc of puff pastry so as to obtain a circle as large as the surface of the cake10.
Step 11
Place the disc as a cover being careful not to press near the eggs. At this point, fold the edges of the first sheet inwards, pinching them to create a decoration11.
Step 12
Brush the surface of the cake with a beaten egg yolk together with a drop of milk, then, with a long skewer, pierce the surface of the pastry in the center and near the edges in order to let the steam that will be created during cooking escape12.
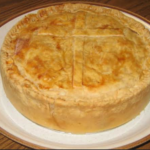
Step 13
Place the Easter cake in the lower part of the oven and cook it in static mode at 200 °C for about 40 minutes, then lower the temperature to 180 °C and continue for another 10-15 minutes or until the surface is golden13.
Step 14
Leave the cake to cool for at least an hour, then turn it out onto a serving plate and let it rest for at least 6 hours: in this way it will settle and will be easier to cut. Serve the Easter cake by cutting it into slices to reveal the surprise effect of the filling14.
Advise
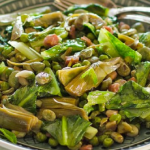
If you prefer, you can replace the spinach with fresh chard , radicchio or wild herbs , as in the Ventimiglia version.
storage
The Easter cake can be stored in the refrigerator, well covered with a sheet of transparent film, for 2-3 days . Once cooked and completely cooled, it can be frozen, even already cut into slices: when you decide to taste it, let it defrost in the fridge before heating it in the oven for a few minutes.